Mapping Excel VB Macros to Python
A handy feature in Excel is the ability to quickly record a Visual Basic (VB) macro and save it. It's also fairly simple to take a captured VB macro, tweak it slightly and use it in your Python scripts. I've used this capability dozens of times over the years to capture a sequence of operations that modify a spreadsheet and build a pivot table or chart, then integrate the macro into a Python script. It wasn't always apparent to me how I could take the macro and use it within Python or other scripting languages beside Visual Basic, but I now have a pretty good grasp and want to share the technique with you.
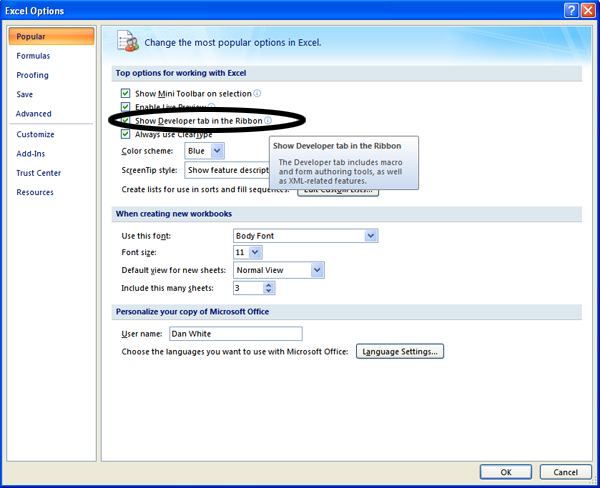
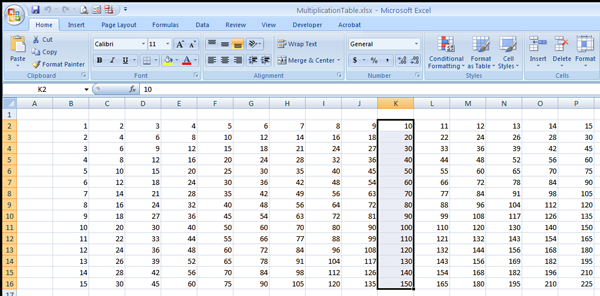
This post illustrates how to capture a simple set of operations in a macro, examine the Visual Basic macro, port it to Python and run it. I'm using the MultiplicationTable.xlsx file as a starting point, it's a simple 10×10 multiplication table that will be expanded and reformatted. The first step is to capture the macro in Excel using Record Macro. In Excel 2007 the Developer tab that contains the Record Macro button is turned off by default, you will need to enable it by selecting "Excel Options" from the ribbon menu, then select "Popular" in the left hand column and select the "Show Developer tab in the Ribbon" checkbox as shown here.
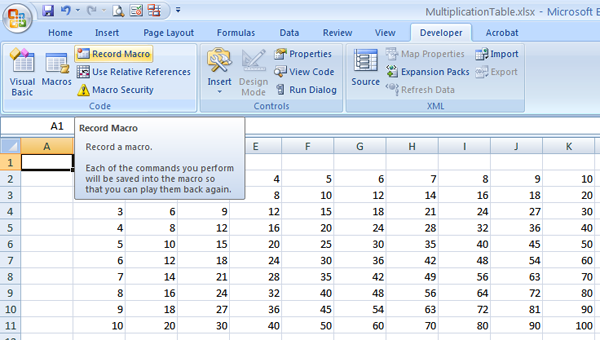
Starting with a simple spreadsheet containing a table of data, click on the "Developer" tab, then "Record Macro".
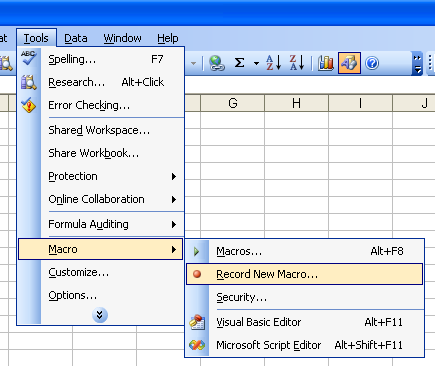
If you're using an older version of Excel, select Tools->Macro->Record New Macro from the menu as shown here.
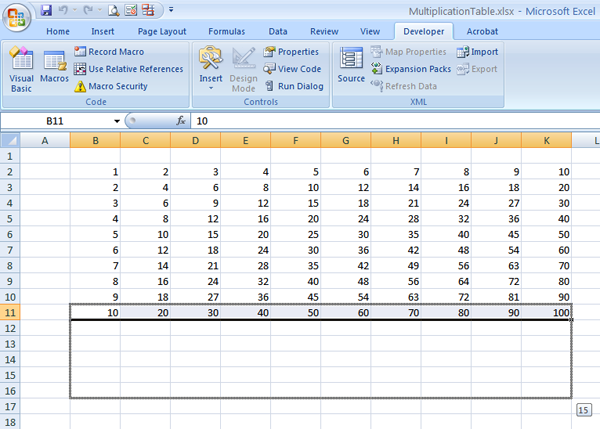
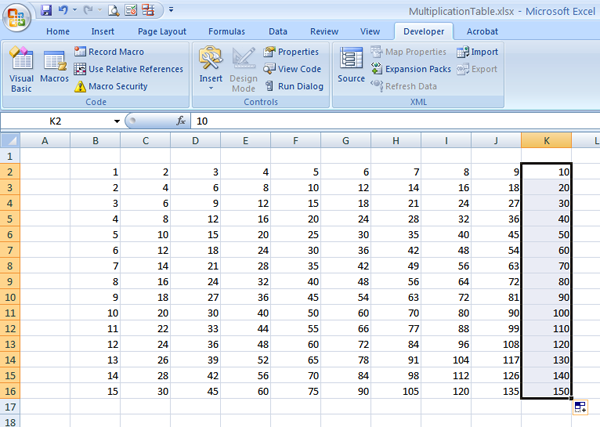
The goal is to expand the existing table to a 15×15 table, adjust the column width to make the table appear more square and save the new spreadsheet. Now that the macro is recording, the first step is to select the last row of data and expanding it by dragging it down an additional 5 rows. First, select the data:

then dragged to create 5 new rows of data.
Do the same select and drag operation for the last column of data to create 5 new columns.
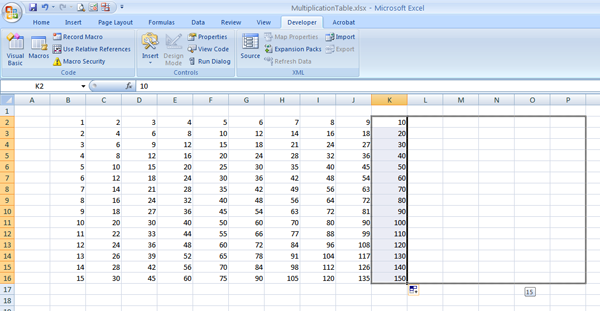
Now you have a 15×15 multiplication table. To resize the columns, select the headers for columns B through P, click the right mouse and select "Column Width".
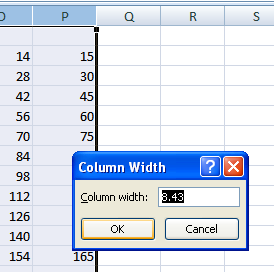
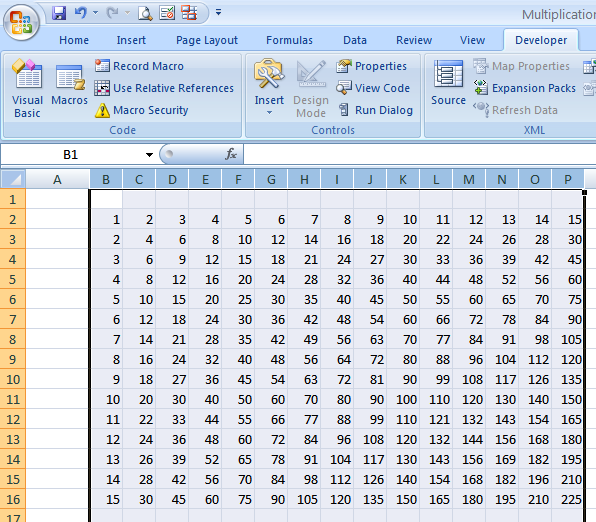
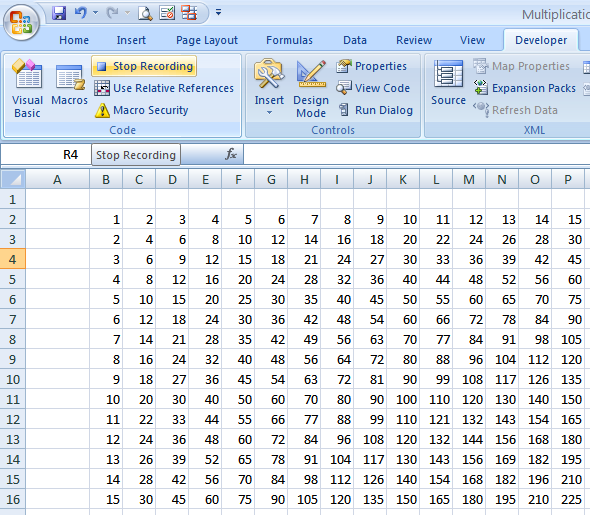
Enter "4" as the new column width and click OK. The spreadsheet will now look like this:
Now stop capturing the macro by clicking on Stop Recording
If you're using an older version of Excel, select Tools->Macro->Stop Recording from the menu bar.
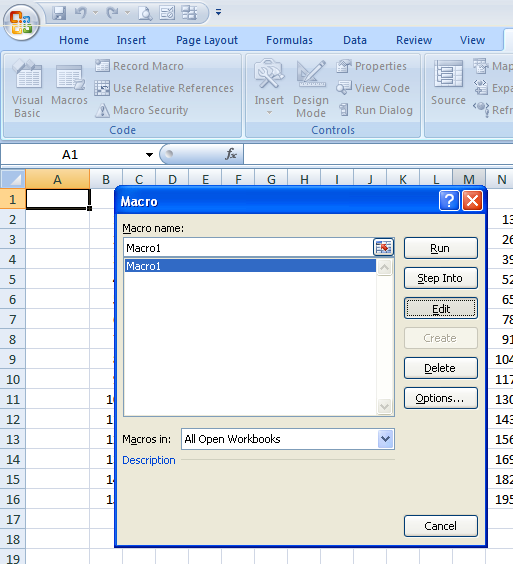
To view the macro, click on the View Macros button

For older versions of Excel, select Tools->Macro->Macros
Select the macro you just recorded (this should be Macro1, but if you were experimenting you may have other macros, so select the highest numbered macro) and click Edit.
This will open your macro in the Microsoft Visual Basic GUI, and it should look something like this
Sub Macro1()
'
' Macro1 Macro
'

'
    Range("B11:K11").Select
    Selection.AutoFill Destination:=Range("B11:K16"), Type:=xlFillDefault
    Range("B11:K16").Select
    Range("K2:K16").Select
    Selection.AutoFill Destination:=Range("K2:P16"), Type:=xlFillDefault
    Range("K2:P16").Select
    Columns("B:P").Select
    Selection.ColumnWidth = 4
End Sub
Don't worry if there are some extra or redundant lines in your macro, they can be removed as the script is ported. Now we're ready to fire up Python and integrate this macro into a script.
Porting
To get started, start the Python Integrated Development Environment (IDLE), then open the spreadsheet with the 10×10 multiplication table by entering the following four commands (make sure the file "MultiplicationTable.xlsx" is in your My Documents folder.

Your screen should now look like this:
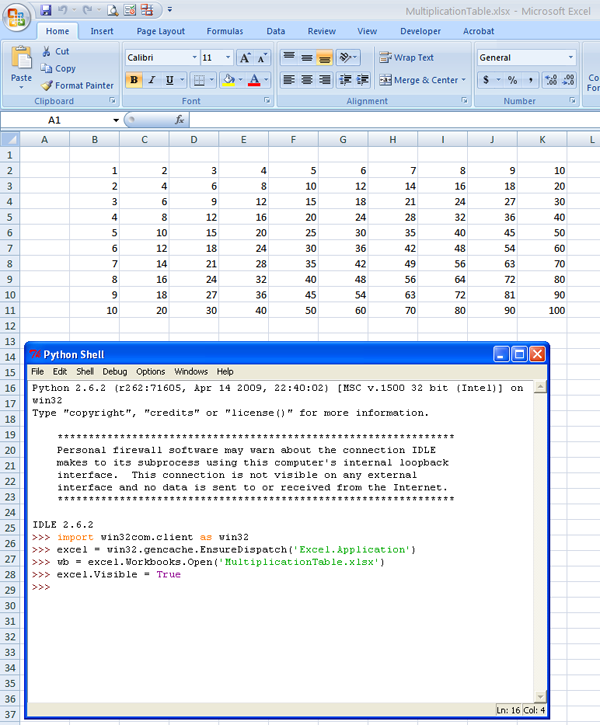
These are boilerplate commands you'll be using in each exercise to invoke and interface to Excel. The first two commands, import win32com.client as win32, and excel =win32.gencache.EnsureDispatch( 'Excel.Application'), import the win32 module and open the Excel process. The command wb = excel.Workbooks.Open('MultiplicationTable.xlsx') opens the worksheet. In general, you'll need a excel.Workbooks.Open() or excel.Workbooks.Add() command to open an existing workbook or create a new workbook. The command excel.Visible = Truemakes Excel visible on the screen, rather than running as a hidden process in the background.
Looking at the Macro1 macro, the first command is Range("B11:K11").Select. The Rangevariable name is within the context of the Worksheet, so you need to create a container for operations on the worksheet. The command ws = wb.Worksheets('Sheet1') will do the trick.

If you noticed, I made a typo when entering the command and typed Worksheet instead of Worksheets. Don't panic if you make a mistake as I did, in most cases you can simply retype the correct command and continue on.
Once the variable pointing to the worksheet is defined, append the macro command to ws. and try it. Note that Select is a function and requires the open and close parenthesis pair in order to operate correctly. This pattern may be used for every Range().Select line in the macro.

If you bring the worksheet to the foreground, you'll see that the range B11:K11 has been selected. The next task is to autofill the 5 rows below using the Selection.AutoFillDestination:=Range("B11:K16"), Type:=xlFillDefault construct. Selection is a method at the Excel Application level, you need to precede it with excel. in this example. The arguments Destination:=Range("B11:K16"), Type:=xlFillDefault must be provided to the function, either using the keyword arguments Destination and Type, or by using positional notation. To make your programs as robust as possible, you should include the keywords, but it's not strictly required and I don't use that pattern in this example.
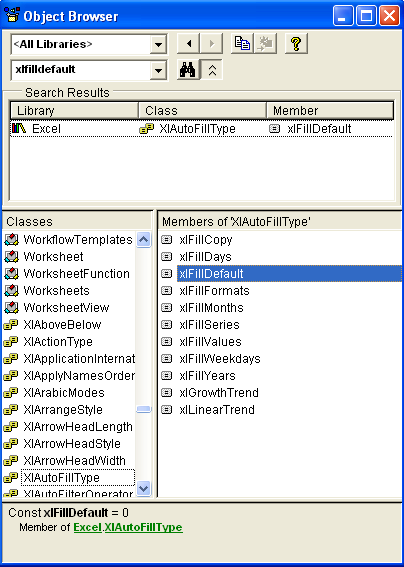
The definition for the constant xlFillDefault is contained in win32.constants, you can access this value by specifying win32.constants.xlFillDefault. I've seen many examples where the developer replaces this with the actual value (0 in this case). My preference is to avoid replacing Excel variables with numbers in my scripts, I believe that including the variable names increases the clarity of the script. My preference is to use the fully specified name wherever possible, but if you have to replace the variable with the actual value, you can always use the Object Browser in the VB window to figure out the correct value (open the Object Browser by pressing F2, or by selecting View->Object Browser from the menu in the VB window.
Combining these translations, the full Python command is excel.Selection.AutoFill(Destination=ws.Range("B11:K16"), Type=win32.constants.xlFillDefault ), or excel.Selection.AutoFill( ws.Range("B11:K16"), win32.constants.xlFillDefault) as I've used in the example.

Occasionally you'll make a mistake when capturing a macro and record extraneous, unnecessary commands. The command Range("B11:K16").Select isn't needed and can be ignored. The next two macro commands, Range("K2:K16").Select and Selection.AutoFillDestination:=Range("K2:P16"), Type:=xlFillDefault, are translated in the same way as the Select and AutoFill commands discussed earlier.
The commands Range("K2:K16").Select and Selection.AutoFill Destination:=Range("K2:P16"), Type:=xlFillDefault are translated in the same fashion as the earlier Select and AutoFillcommands as shown below.

The worksheet is now expanded to the full 15×15 table and looks like this:
The next section of the macro selects columns B through P and sets their width to 4. The statement Columns("B:P").Select is a property of the worksheet, so prefix it with the ws.identifier and add the parenthesis to make it a Python function call. In the next statement,Selection is a property of excel, so prefix it as such. The translated statements are shown below.

The Excel spreadsheet is now complete, the multiplication table has been expanded to 15×15 and the columns have been resized to 4. At this point, translation of the macro is complete, but the modified file has to be saved. To write the file and quit Excel, use the SaveAs and Quit methods as shown below.

For your reference, here is the complete Python script.
#
# make15x15.py
# Expand an existing 10x10 multiplication table and resize columns
#
import win32com.client as win32
excel = win32.gencache.EnsureDispatch('Excel.Application')
wb = excel.Workbooks.Open('MultiplicationTable.xlsx')
excel.Visible = True
ws = wb.Worksheets('Sheet1')
ws.Range("B11:K11").Select()
excel.Selection.AutoFill(ws.Range("B11:K16"),win32.constants.xlFillDefault)
ws.Range("K2:K16").Select()
excel.Selection.AutoFill(ws.Range("K2:P16"),win32.constants.xlFillDefault)
ws.Columns("B:P").Select()
excel.Selection.ColumnWidth = 4
wb.SaveAs('NewMultiplicationTable.xlsx')
excel.Application.Quit()
If this is the first time you've ported an Excel macro from VB to Python, congratulations! Please note that in this example, things are kept simple and there is absolutely no error checking or exception handling used here. Normally you would need to provide at least a minimal level of error checking and exception handling in your script so that common errors (missing input file, can't invoke Excel, etc) are caught and handled nicely. Also, this example was developed using Excel 2007, but you can run this code verbatim on earlier versions of Excel if you change the .xlsx file extension to .xls throughout the script.
Some Porting Guidelines
- Prefix the
Range().Selectstatements with the variable name pointing to the worksheet (wsin this example) - Append
()to any functions - Prefix the
Selectionstatements with the variable name for the Excel spreadsheet (excelin this example) - Prefix the
Columnsstatements with the variable name for the worksheet(wsin this example)
Porting Reference Table for this example
Note that I didn't capture the Workbooks.Open() or Workbooks.SaveAs lines in the VB script, it's left as an exercise for the reader to research those commands.
| VB | Python |
|---|---|
| import win32com.client as win32 | |
| excel = win32.gencache.EnsureDispatch('Excel.Application') | |
| wb = excel.Workbooks.Open('MultiplicationTable.xlsx') | |
| wb = excel.Workbooks.Open('MultiplicationTable.xlsx') | |
| excel.Visible = True | |
| ws = wb.Worksheets('Sheet1') | |
| Range("B11:K11").Select | ws.Range("B11:K11").Select() |
| Range("B11:K11").Select | ws.Range("B11:K11").Select() |
| Selection.AutoFill Destination:=Range("B11:K16"), Type:=xlFillDefault | excel.Selection.AutoFill(ws.Range("B11:K16"),win32.constants.xlFillDefault) |
| Range("K2:K16").Select | ws.Range("K2:K16").Select() |
| Selection.AutoFill Destination:=Range("K2:P16"), Type:=xlFillDefault | excel.Selection.AutoFill(ws.Range("K2:P16"),win32.constants.xlFillDefault) |
| Range("K2:P16").Select | ws.Columns("B:P").Select() |
| Columns("B:P").Select | ws.Columns("B:P").Select() |
| Selection.ColumnWidth = 4 | excel.Selection.ColumnWidth = 4 |
| excel.Application.Quit() |
Prerequisites
Python (refer to http://www.python.org)
Win32 Python module (refer to http://sourceforge.net/projects/pywin32)
Microsoft Excel (refer to http://office.microsoft.com/excel)
Source Files and Scripts
Source for the program make15x15.py and data text file are available at http://github.com/pythonexcels/examples
That's all for now, thanks — Dan